Battery switch on travel trailer function is crucial for managing your RV’s power. Understanding how these switches work—whether it’s a simple 1-2-both or a more complex system—is key to avoiding electrical issues and maximizing your camping experience. This guide breaks down the types of switches, their locations, operation, troubleshooting, and maintenance, empowering you to confidently manage your travel trailer’s power sources.
We’ll explore the different battery switch types (like 1-2-both, 1-2-off), their pros and cons, and how to choose the right one for your needs. We’ll also cover safety, troubleshooting common problems, and preventative maintenance to keep your system running smoothly. Get ready to become a power management pro!
Battery Switch Types in Travel Trailers
Choosing the right battery switch for your travel trailer is crucial for managing your power sources effectively and preventing accidental drain. Understanding the different types available will help you make an informed decision based on your needs and budget. This section will detail the common types, their pros and cons, and help you compare them side-by-side.
Types of Battery Switches
Travel trailers typically utilize battery switches to isolate and control the flow of power from your house batteries (deep-cycle batteries powering your trailer’s appliances) and your starting battery (which powers your vehicle’s engine). The most common types are 1-2-Both switches and 1-2-Off switches. Some more advanced systems may incorporate more complex configurations, but these two are the most prevalent.
1-2-Both Battery Switches, Battery switch on travel trailer function
A 1-2-Both switch allows you to select between three positions: “1” (connects only the starting battery), “2” (connects only the house batteries), and “Both” (connects both the starting and house batteries). This is a versatile option, offering good control over your power sources.
Advantages and Disadvantages of 1-2-Both Switches
- Advantages: Flexibility in choosing which battery bank to use, allows for charging both batteries simultaneously, relatively simple to operate.
- Disadvantages: Can be a bit more complex to understand for first-time users, slightly higher risk of accidentally connecting both batteries in situations where one is drained.
1-2-Off Battery Switches
A 1-2-Off switch provides two positions for connecting the batteries (“1” and “2”) and an “Off” position which completely disconnects both batteries from the system. This offers better protection against accidental drain and potential parasitic loads.
Advantages and Disadvantages of 1-2-Off Switches
- Advantages: Offers complete isolation of both batteries when switched to “Off,” simpler to use in terms of preventing accidental drain, generally more straightforward to understand.
- Disadvantages: Less flexibility than the 1-2-Both switch, requires manually switching to access either battery bank individually.
Comparison of Battery Switch Types
| Feature | 1-2-Both Switch | 1-2-Off Switch |
|---|---|---|
| Positions | 1, 2, Both | 1, 2, Off |
| Flexibility | High | Medium |
| Ease of Use | Medium | High |
| Cost | Moderate | Low to Moderate |
| Drain Protection | Medium | High |
Battery Switch Location and Accessibility
Finding your battery switch quickly is crucial in a travel trailer emergency, whether it’s disconnecting power to prevent further damage or simply turning the system on or off. The location of this switch directly impacts your ability to react efficiently and safely.Proper placement ensures easy access for routine maintenance and emergency situations. A poorly located switch, however, can lead to delays, frustration, and even increased safety risks, especially in urgent situations.
Consider accessibility when choosing a location or installing a switch.
Typical Battery Switch Locations
Battery switches in travel trailers are often found in several common locations, though the exact placement varies depending on the manufacturer and model. Some common spots include near the batteries themselves (often in a dedicated compartment), inside a storage compartment near the tongue of the trailer, or even inside a small access panel on the exterior of the trailer.
Less common, but still possible, locations include inside the trailer’s main electrical panel or near the propane tank. Understanding the typical locations helps in quickly identifying the switch in unfamiliar trailers.
Importance of Accessible Battery Switches
Easy access to the battery switch is paramount for both safety and maintenance. In emergencies, like a short circuit or fire, rapidly disconnecting the battery power is vital to prevent further damage or injury. Regularly checking battery levels and connections is also essential for preventative maintenance, and this is much easier with a readily accessible switch. An easily accessible switch saves time and reduces the risk of accidents during both routine checks and emergencies.
Safety Hazards of Poorly Placed Switches
Poorly placed or inaccessible battery switches pose several safety hazards. If the switch is hidden, difficult to reach, or located in a cramped or hazardous area, accessing it during an emergency can be significantly delayed. This delay can lead to escalating problems, potentially causing more extensive damage or increasing the risk of injury from fire or electrical shock. Additionally, if the switch is located in an area exposed to the elements, corrosion or damage to the switch itself could occur, compromising its functionality.
So, you’re planning a trip? Awesome! First things first, grab some peace of mind with travel insurance. Check out Aon travel insurance for solid coverage. Then, if you’re hitting the road in an RV, knowing how the battery switch on travel trailer function works is crucial – you don’t want to get stranded! Understanding your battery system ensures a smooth and enjoyable adventure.
Ideal Battery Switch Placement Considerations
Imagine a diagram showing three common travel trailer layouts: a single-axle trailer, a tandem-axle trailer, and a fifth-wheel trailer. Each diagram displays the trailer’s exterior and interior, highlighting potential battery switch locations.For the single-axle trailer, the illustration shows the battery switch located in a readily accessible exterior compartment near the tongue, clearly marked and protected from the elements. In the tandem-axle trailer, the illustration shows the switch situated within an easily accessible compartment near the batteries themselves, with ample space for maneuverability.
Finally, the fifth-wheel trailer illustration shows the switch positioned in a lockable compartment inside the rear storage area, close to the battery location but easily accessible from the outside, also clearly marked. In all three examples, the switches are positioned away from potential hazards, such as propane tanks or flammable materials, and clearly marked for easy identification. The illustration emphasizes the importance of clear labeling and easily accessible locations in all cases, regardless of trailer type.
Troubleshooting Common Battery Switch Issues
Your travel trailer’s battery switch is a critical component, controlling power to your house batteries. Problems with this switch can leave you stranded without lights, appliances, or even the ability to charge your batteries. Understanding common issues and how to troubleshoot them is essential for any RV owner.
Identifying Common Battery Switch Problems
Several issues can arise with your travel trailer’s battery switch. The most common include a complete lack of power, blown fuses, a switch that feels loose or unresponsive, or the switch failing to properly isolate the batteries. Sometimes, the problem isn’t even with the switch itself but with a related component like corroded battery terminals or a faulty wiring connection.
Diagnosing and Resolving Battery Switch Problems
Troubleshooting begins with a visual inspection. Check the switch for any obvious signs of damage, such as cracks, burns, or loose wiring. Examine the battery terminals for corrosion; this can significantly hinder power flow and cause the switch to appear faulty. Clean any corrosion with a wire brush and baking soda solution. Next, check any fuses associated with the battery switch.
So, you’re planning a trip? Awesome! First things first: get yourself sorted with travel insurance. Check out aon travel insurance for some solid options. They’ve got you covered for all sorts of mishaps. Then, if you’re hitting the road in an RV, understanding your battery switch on travel trailer function is crucial.
Knowing how to manage your power will keep your adventures running smoothly. Don’t forget to pack your sense of adventure!
A blown fuse will appear broken or show a clear break in the filament. Replace any blown fuses with fuses of the same amperage rating. If the problem persists, you might need to use a multimeter to test the voltage at various points in the circuit.
Troubleshooting Flowchart
This flowchart Artikels the steps to diagnose and fix battery switch problems. It’s designed to guide you systematically through the process, minimizing guesswork and ensuring you address the root cause.
Flowchart Description: The flowchart begins with checking for obvious signs of damage to the switch and battery terminals. If damage is found, repair or replace the damaged components. If no damage is visible, the next step is to check the associated fuses. If a fuse is blown, replace it with one of the same amperage. If the problem persists after replacing the fuse, check the voltage at the battery terminals and the switch using a multimeter.
If no voltage is present at the terminals, the problem likely lies with the battery or charging system. If voltage is present at the terminals but not at the switch, the issue is likely within the switch itself or its wiring. If voltage is present at both locations, the problem may be elsewhere in the electrical system of the trailer.
If the switch is loose or feels unresponsive, it might simply need tightening. If all checks are passed and the problem remains, it is recommended to seek professional assistance from a qualified RV technician.
Battery Switch Integration with Other Systems
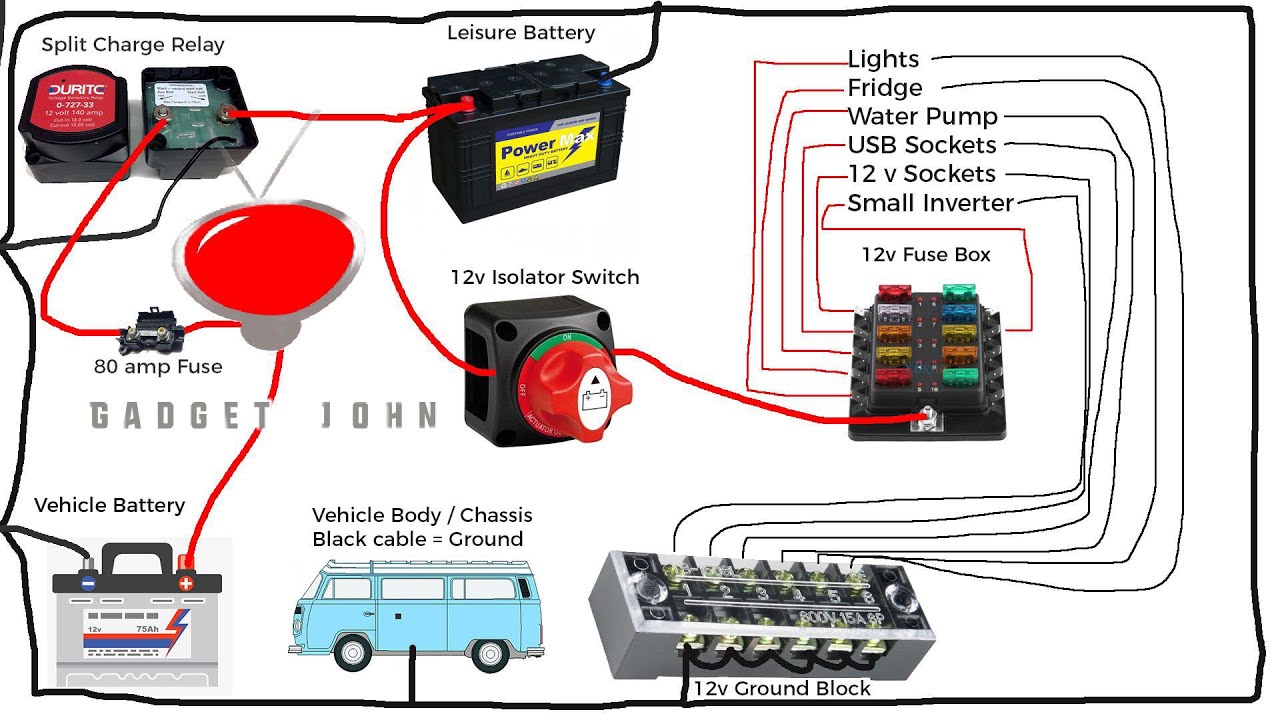
Your travel trailer’s battery switch isn’t just a simple on/off switch; it’s a crucial component in managing power flow between your batteries and the various electrical systems in your RV. Understanding how it interacts with other systems is key to maximizing your power usage and avoiding potential problems. This section will detail the interactions between the battery switch and common RV electrical components like solar panels, inverters, and shore power.The battery switch acts as the central control point for DC power distribution from your house batteries.
Its position directly influences which systems are powered by your batteries and how power flows when using different power sources. Incorrect settings can lead to unexpected behavior, from drained batteries to damaged components.
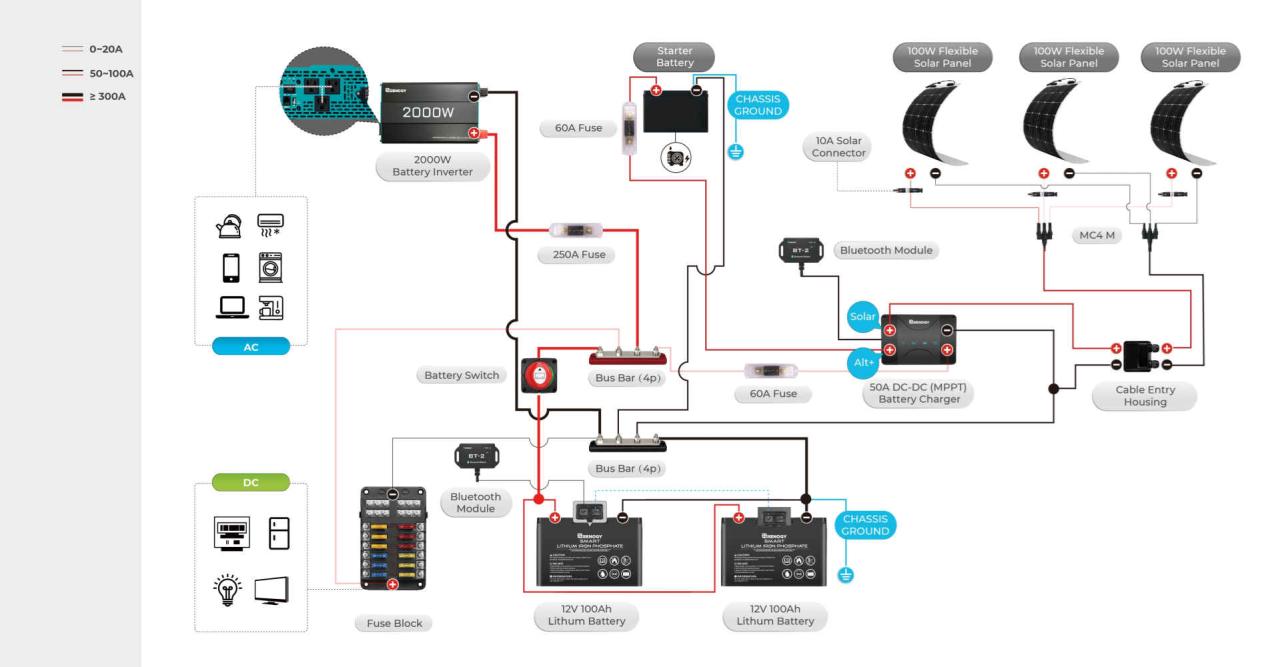
Solar Panel Integration
Solar panels provide a renewable source of power for your RV. When your solar panels are charging your batteries, the battery switch needs to be in the “on” or “both” position (depending on your switch type) to allow the solar charge controller to properly charge your batteries. If the switch is off, the solar panels won’t be able to charge the batteries, even though they may be producing power.
Conversely, if the switch is in the “on” position, the charged batteries will supply power to your RV’s DC systems, whether or not the sun is shining.
Inverter Interaction
Inverters convert DC power from your batteries into AC power, allowing you to run appliances that require alternating current. The battery switch must be in the “on” position for the inverter to function. If the switch is off, the inverter will not have access to the battery power and will not be able to produce AC power. This is crucial for situations where you’re relying on battery power for appliances like refrigerators or lights.
A low battery warning system may be activated in this scenario, indicating the battery power is being heavily used.
Shore Power Management
Shore power, typically connected to a campsite’s electrical hookup, provides an external source of AC power. The battery switch’s position is less critical when shore power is connected, as shore power generally bypasses the batteries for powering AC appliances. However, the battery switch should still be in the “on” or “both” position to allow for charging of the batteries from shore power via the converter.
If the switch is off, your batteries will not charge while plugged into shore power, potentially leaving you with a depleted battery bank. This is because the converter, which converts AC to DC to charge the batteries, requires a functioning DC path to the batteries.
Mastering your travel trailer’s battery switch is essential for a safe and enjoyable RVing experience. From understanding the various switch types and their functionality to troubleshooting common issues and performing preventative maintenance, this guide provides the knowledge you need to confidently manage your power. By following the tips and advice presented, you can ensure your electrical system remains reliable, keeping your lights on and your appliances running smoothly, no matter where your adventures take you.
Commonly Asked Questions: Battery Switch On Travel Trailer Function
What happens if I accidentally leave my battery switch in the wrong position?
Depending on the position, you might drain one or both batteries. Always double-check the switch position before disconnecting from shore power or leaving your trailer for an extended period.
How often should I check my battery switch for corrosion?
Inspect your battery switch at least twice a year, or more often if you live in a humid climate. Corrosion can significantly impact performance and safety.
Can I replace my battery switch myself?
You might be able to, depending on your mechanical skills and the complexity of your system. However, if you’re unsure, it’s best to consult a qualified RV technician to avoid potential electrical hazards.
My battery switch is making a clicking sound. What does that mean?
A clicking sound usually indicates a problem with the switch itself or a low battery voltage. Check your battery levels and fuses. If the problem persists, consult a professional.
